Grey Iron Casting Technical Analyzing
1. Terms and definitions
The terms established in GB/T 5611 and the following terms and definitions are applicable to this standard GBT 9439-2010.
The relevant wall thickness
The relevant wall thickness of the casting refers to the section thickness of the casting used to define the mechanical properties of the casting material, and is agreed by both the supplier and the buyer.
2. Ordering requirements
The following ordering information should be provided by the casting buyer:
- a) Casting material grades;
- b) Any special requirements should be agreed between the supplier and the buyer.
3. Production methods of iron cast
Adopts green sand casting or shell sand casting to produce iron-grey casting parts.
The production method of gray cast iron parts is determined by Yide casting supplier (JM casting factory). If casting client has special requirements (other casting methods or heat treatment, etc.), Yide casting and cast iron customers shall agree on it.
4. Chemical composition of cast iron parts
If the technical requirements of our casting customers include the acceptance requirements of chemical components, the requirements of the cast iron customer shall be followed. The chemical composition shall be tested according to the frequency and quantity agreed between the Yide casting supplier and the iron casting buyer.
The chemical composition is determined by the cast irons supplier, if the cast iron customer has no requirements for it, and the chemical composition is not used as the basis for casting acceptance. However, the selection of chemical components must ensure that the casting materials meet the mechanical properties and metallographic requirements specified in this standard.
5. Technical requirements
Mechanical properties
Whether the mechanical properties are measured on the separately cast test coupon or on the casting body, and whether the tensile strength or the hardness is used as the performance acceptance index must be clearly specified in the order agreement or the technical requirements of the buyer. The acceptance index of the mechanical properties of castings shall be clearly specified in the order agreement.
For the mechanical and physical properties of gray cast iron test coupons, see Appendix A.
The mechanical properties and metallographic structure specified in this standard are the main indicators for casting acceptance.
6. Tensile strength
Tensile strength of separately cast test coupon
This standard classifies gray cast iron into eight grades based on the minimum tensile strength value measured on a standard tensile specimen processed with a 30 mm diameter separately cast test coupon. The minimum tensile strength value of each grade should meet the requirements of table 1.
Grades and Mechanical Properties of Gray Cast Iron
Table 1
| Grey Cast Iron Grade |
Casting Wall Thickness
(mm) |
Minimum Tensile Strength Rm(Mandatory value) |
Casting body expectations
Tensile strength Rm(min)
MPa |
| Single Cast Test Rod |
Cast Test Rod or Test Block |
| ﹥ |
≦ |
MPa |
MPa |
MPa |
| HT100 |
5 |
40 |
100 |
– |
– |
| HT150 |
5 |
10 |
150 |
– |
155 |
| 10 |
20 |
– |
130 |
| 20 |
40 |
120 |
110 |
| 40 |
80 |
110 |
95 |
| 80 |
150 |
100 |
80 |
| 150 |
300 |
90 |
– |
| HT200 |
5 |
10 |
200 |
– |
205 |
| 10 |
20 |
– |
180 |
| 20 |
40 |
170 |
155 |
| 40 |
80 |
150 |
130 |
| 80 |
150 |
140 |
115 |
| 150 |
300 |
130 |
– |
| HT225 |
5 |
10 |
225 |
– |
230 |
| 10 |
20 |
– |
200 |
| 20 |
40 |
190 |
170 |
| 40 |
80 |
170 |
150 |
| 80 |
150 |
155 |
135 |
| 150 |
300 |
145 |
– |
| HT250 |
5 |
10 |
250 |
– |
250 |
| 10 |
20 |
– |
225 |
| 20 |
40 |
210 |
195 |
| 40 |
80 |
190 |
170 |
| 80 |
150 |
170 |
155 |
| 150 |
300 |
160 |
– |
Tensile strength of attached test coupon (bars)
The tensile strength of the attached test coupon (bars) shall meet the requirements of Table 1.
Tensile strength of casting body
Table 1 gives the reference values of the tensile strength of the gray iron castings with different wall thicknesses.
Sampling position of casting body
The sampling position, sample size and tensile strength value of the casting body can be agreed between the supplier and the buyer. If the buyer has specified it, it should meet the buyer’s drawings and technical requirements.
If the purchaser requires sampling from the casting body, but the sampling position of the body is not specified, the supplier can determine the sampling position according to the casting structure and the force situation. The size of the body sample is shown in Table 5.
The frequency and quantity of the tensile strength test of the casting body shall be agreed between the supplier and the buyer.
Hardness grade and casting hardness
The hardness level of gray cast iron is divided into six levels, see Table 2. The hardness of each hardness level refers to the upper limit hardness value of the main wall thickness t > 40 mm and the wall thickness ≤ 80 mm.
Table 2 Gray cast iron hardness grade and casting hardness
| hardness grade |
main wall thickness/mm |
casting hardness/HBW |
| > |
≤ |
min |
max |
| H155 |
5 |
10 |
— |
185 |
| 10 |
20 |
— |
170 |
| 20 |
40 |
— |
160 |
| 40 |
80 |
— |
155 |
| H175 |
5 |
10 |
140 |
225 |
| 10 |
20 |
125 |
205 |
| 20 |
40 |
110 |
185 |
| 40 |
80 |
100 |
175 |
| H195 |
4 |
5 |
190 |
275 |
| 5 |
10 |
170 |
260 |
| 10 |
20 |
150 |
230 |
| 20 |
40 |
125 |
210 |
| 40 |
80 |
120 |
195 |
| H215 |
5 |
10 |
200 |
275 |
| 10 |
20 |
180 |
255 |
| 20 |
40 |
160 |
235 |
| 40 |
80 |
145 |
215 |
| H235 |
10 |
20 |
200 |
275 |
| 20 |
40 |
180 |
255 |
| 40 |
80 |
165 |
235 |
| H255 |
20 |
40 |
200 |
275 |
| 40 |
80 |
185 |
255 |
| Note 1: The relationship between hardness and tensile strength is shown in Appendix B, and the relationship between hardness and wall thickness is shown in Appendix C.
Note 2: The numbers in bold indicate the maximum and minimum hardness values of the main wall thickness corresponding to the hardness grade.
Note 3: At a certain position of the casting agreed by both supplier and buyer, the hardness difference of the casting can be controlled within the hardness range of 40 HBW. |
If the buyer requires hardness as the acceptance index, the frequency and quantity of hardness testing shall be agreed between the supplier and the buyer, and one of the following acceptance rules shall be selected:
- The hardness value of the casting body should meet the requirements of Table 2.
- b) When measuring the hardness of the material on the sample processed by the separately cast test coupon, it should meet the requirements of Table
If the buyer has clearly specified the test location and hardness value of the casting body, it shall meet the buyer’s drawings and technical requirements.
Note 1: The classification of hardness grades is applicable to castings with mechanical processing properties and anti-wear properties.
Note 2: Castings with main wall thickness t > 80 mm, are not graded according to hardness.
Metallography
The test method and test items of the metallographic structure of gray cast iron parts shall comply with the provisions of GB/T 7216. If the buyer clearly stipulates the number, distribution, grade and sampling position of each test item of the metallographic structure, it shall be implemented according to the buyer’s drawing and technical requirements.
Geometry and dimensions
The casting geometry and dimensions should meet the buyer’s drawings or technical requirements.
Dimensional tolerance
The dimensional tolerance of castings should meet the buyer’s drawings or technical requirements. If there is no special requirement, it shall be implemented according to the provisions of GB/T 6414.
Machining allowance
The machining allowance of castings should meet the buyer’s drawings or technical requirements. If there is no special requirement, it shall be implemented according to the provisions of GB/T 6414.
Weight deviation
The weight deviation of castings should meet the buyer’s drawings or technical requirements. If there is no special requirement, it shall be implemented according to the provisions of GB/T 11351.
Surface quality
The surface quality of the casting includes the outer surface and inner surface quality.
1. The surface roughness of the castings shall comply with the provisions of GB/T 6060.1, or the drawings and technical requirements of the buyer.
2. The castings should be cleaned up, trim the excess parts and remove the residues of the riser and inner cavity, arbor and sand burning. The allowable casting riser residues, mantles, flying thorn residues, internal cavity cleanliness, etc. of the casting shall comply with the buyer’s drawing, technical requirements or the order agreement between the supply and buyer.
3. Unless otherwise specified, castings are delivered as-cast.
During the delivery of castings, it shall meet the protection, packaging, storage and transportation specifications of the buyer.
Casting defects
1. It is not allowed to have defects that affect the performance of castings, such as cracks, cold shut, shrinkage cavity, etc.
2. Surface defects within the machining allowance range are allowed on the machining surface of castings.
3. The types, scope and number of defects allowed on the non-machined surface of the casting and within the casting shall comply with the buyer’s drawings, technical requirements or the order agreement between the supplier and the buyer.
4. In principle, the machining surface of castings shall not be welded or repaired, but with the permission of the buyer, the defects that do not affect the structural performance can be welded and repaired without affecting the mechanical processing.
Special requirements
If the buyer has requirements for magnetic particle inspection, ultrasonic inspection, radiographic inspection, etc., it shall be agreed between the supplier and the buyer.
Sampling requirements
General
If heat treatment is used to change the properties of the material, the specimen should be heat treated in the same manner as the casting it represents.
Tensile specimen
Separately cast test coupon
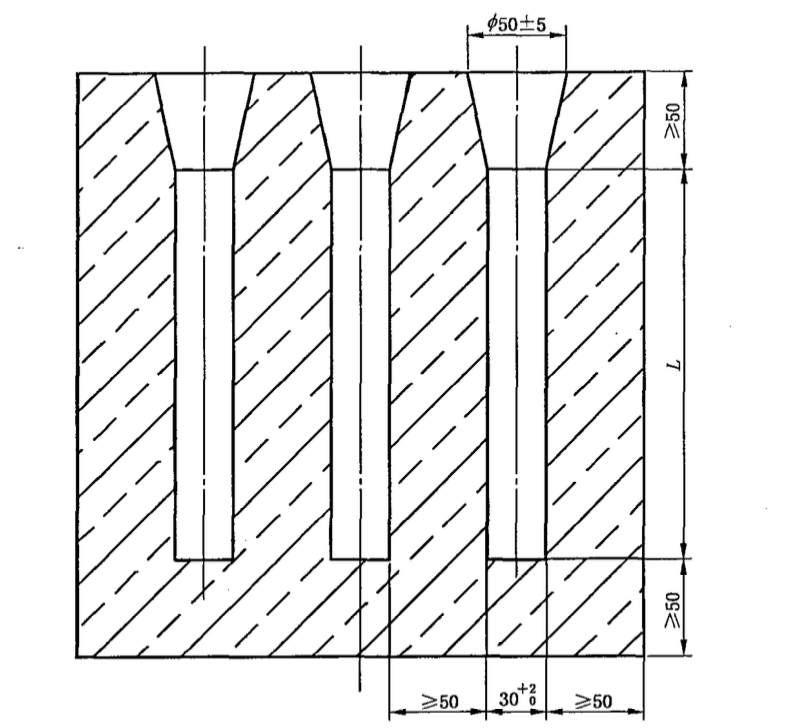
The separately cast test coupon used to determine the material performance grade should be neutrally poured with the castings it represents in a sand mold with similar cooling conditions or thermal conductivity (see Chart1 for the mold). More than three of the same mold must be poured simultaneously. The minimum sand thickness between the test coupon shall not be less than 50 mm. The length of the test coupon is determined according to the length of the sample and the clamping device, as shown in Chart 1.
the unit is mm

Chart 1 Separately cast test coupon mold
The length of the test coupon depends on type A or type B specimen (see 9.2) and the length of the clamping section.
The other dimensions of the test coupon should meet the requirements of Chart 1.
The dimensions of the samples processed with separately cast test coupons see Table 4.
If the buyer has special requirements for the size of the separately cast test coupon and the processed sample, the technical requirements of the buyer shall be followed.
The test coupon must be poured with the same batch of molten iron pouring the castings, and the test coupon should be poured later in the casting of this batch of molten iron.
The sampling frequency of separately cast test coupons shall comply with the provisions 10.3.
The temperature at which the test coupon unboxing should not exceed 500℃. If the casting requires heat treatment, the test coupon should be treated in the same furnace as the representative casting; when the casting is subjected to stress relief aging treatment, the test coupon may not be processed.
Note: After consultation between the supply and buyer, when the castings unbox above 500℃, the separately cast test coupons can also be unboxed above 500℃.
Attached test coupon (bar)
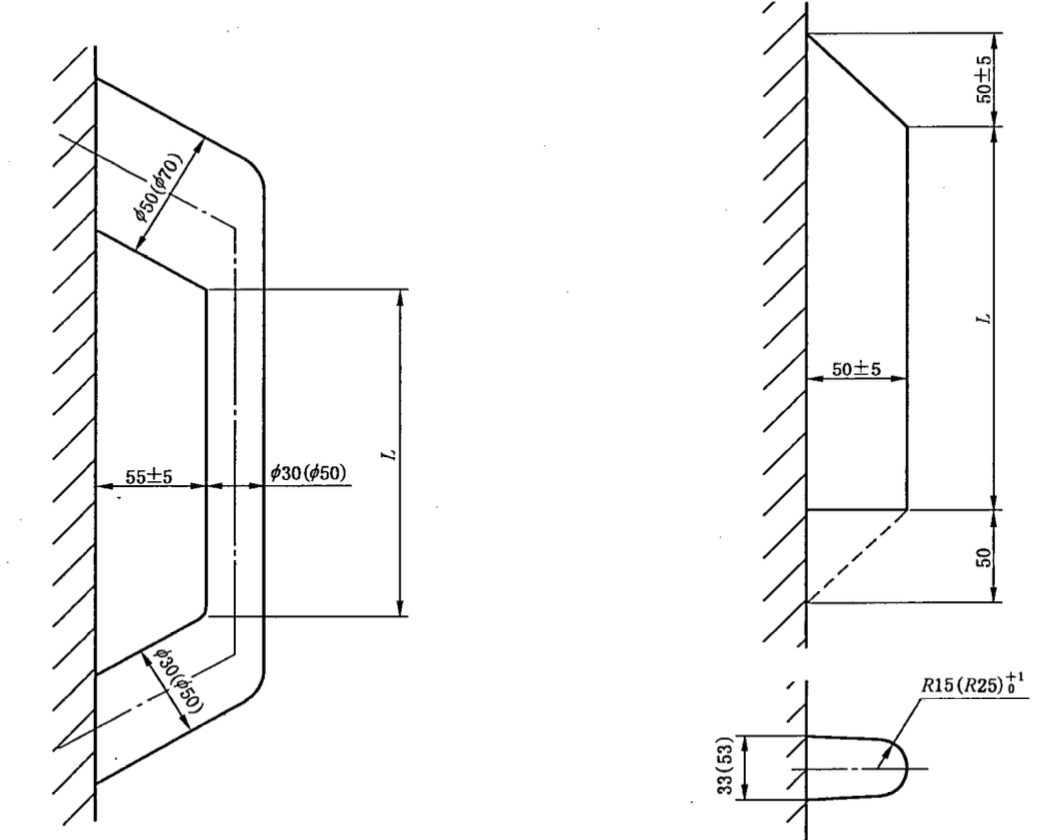
When the wall thickness of the casting exceeds 20 mm and the weight exceeds 2000 kg, tensile strength can also be tested by using an additional casting test coupon (see Chart 2) or an additional casting test bar (see Chart 3) similar to the cooling conditions of the casting. The measurement result is closer to the performance of the casting material than that of the separately cast test coupon, and the measured value should meet the requirements of Table 1.
The cooling conditions of the attached test coupons (bars) should be similar to the representative castings. The type of the attached test coupons (bars) and the location of the attached casting should be agreed between supplier and buyer. If there is no agreement between the two parties, it should be attached to a representative part of the casting. The length of the attached test coupons (bars) is determined according to the length of the sample and the clamping device. The numbers in parentheses in the Chart apply to test coupon with diameter of 50 mm, and bar with radius of 25mm.
If the casting needs heat treatment, the attached test coupons (bars) should be cut after the casting is heat treated.
The length of the test coupon and test bar (see Chart 2 and Chart 3) depends on the length of the specimen and the length of the clamping end.
Note: The D30 mm attached casting test coupon and R15mm bar is suitable for castings with wall thickness below 80 mm. And D50 mm attached casting test coupon and R25mm bar is suitable for castings with wall thickness above 80 mm.
Test casting body
The sampling position of the casting body sample shall be agreed by both parties.
The processing dimensions of test casting body see Table 5.
The unit is mm

Chart 2 attached test coupon Chart 3 attached test bar
Hardness test block
If the buyer takes hardness as the acceptance index, the hardness should meet the requirements of 7.1.2.
The hardness can be tested on a separately cast test coupon. See Table 3 for hardness values.
Table 3 Tensile strength and hardness values of the separately cast test coupon
| Grade |
Minimum tensile strength
Rm(min)
MPa |
Brinell hardness
HBW |
Grade |
Minimum tensile strength
Rm(min)
MPa |
Brinell hardness
HBW |
| HT100 |
100 |
<170 |
HT250 |
250 |
180~250 |
| HT150 |
150 |
125~205 |
HT275 |
275 |
190~260 |
| HT200 |
200 |
150~230 |
HT300 |
300 |
200~275 |
| HT225 |
225 |
170~240 |
HT350 |
350 |
220~290 |
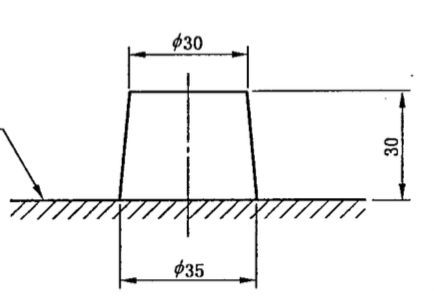
The hardness can also be tested at a location on the casting agreed upon by the supplier and the buyer, or on the hardness test block shown in Chart 4. The test block is used for castings with a wall thickness of not less than 20 mm. The test block is cut from the casting.
If the casting needs heat treatment, the test block should be cut after the casting heat treatment.
The unit is mm

Casting surface
Chart 4 Brinell hardness block
Test methods
Tensile test requirements
The tensile test shall be carried out in accordance with GB/T 228.
Testing of tensile specimens
There are two types of tensile specimens: A type and B type. Both ends of the sample can be processed into thread or cylinder shaped to meet the needs of the clamping device. See Chart 5 and Chart 6 for its type and Table 4 for its dimensions. Tensile specimens of other specifications listed in Table 5 may also be used upon agreement between the supplier and buyer.
Chart 5 Type A sample
Chart 6 Type B sample
Note: For the same material, the test result of type A sample may be slightly higher than that of type B.
The minimum measurement accuracy of the parallel section
diameter of the tensile specimen is 0.05mm.
Table 4 Sample size processed by separately cast test coupon
the unit is mm
| Item |
Dimension |
Tolerance |
| Minimum parallel section length |
60 |
|
| Specimen diameter |
20 |
±0.25 |
| Arc radius |
25 |
+5
0 |
| Clamping end |
Cylinder shaped |
Minimum diameter |
25 |
|
| Minimum length |
65 |
|
| Thread shaped |
Thread diameter and pitch |
M30X3.5 |
|
| Minimum length |
30 |
|
Table 5 Dimensions of casting body samples
the unit is mm
| Specimen diameter |
Minimum parallel section length |
Arc radius |
Cylinder shaped clamping end |
Thread shaped clamping end |
| Minimum diameter |
Minimum length |
Thread diameter and pitch |
Minimum length |
| 6±0.1 |
13 |
>1.5d |
10 |
30 |
M10X1.5 |
15 |
| 8±0.1 |
25 |
1.5do |
12 |
30 |
M12X1.75 |
15 |
| 10±0.1 |
30 |
≥1.5d。 |
16 |
40 |
M16X2.0 |
20 |
| 12.5±0.1 |
40 |
≥1.5d。 |
18 |
48 |
M20X2.5 |
24 |
| 16±0.1 |
50 |
≥1.5d。 |
24 |
55 |
M24X3.0 |
26 |
| 20±0.1 |
60 |
25 |
25 |
65 |
M28X3.5 |
30 |
| 25±0.1 |
75 |
≥1.5d。 |
32 |
70 |
M36X4.0 |
35 |
| 32±0.1 |
90 |
>1.5d。 |
42 |
80 |
M45X4.5 |
50 |
| Note 1: Sampling is carried out at the place where the stress of the casting is maximum, or the most important working part of the casting, or the largest sample size can be obtained.
Note 2: When processing samples, large samples should be selected. |
9.3 Hardness test
The determination method of the hardness of gray cast iron shall be implemented in accordance with the provisions of GB/T 231..1~231.3.
When testing the hardness, it should be tested 1.5 mm below on the casting surface.
9.4 Heat treatment
When there are special requirements for the heat treatment of castings, it shall be agreed by both supplier and buyer.
9.5 Chemical analysis
Spectral chemical analysis shall be carried out in accordance with the provisions of GB/T ‘4336.
The conventional chemical composition analysis method of castings shall be carried out in accordance with the provisions of GB/T 223.60.
9.6 Metallographic examination
The metallographic examination of castings shall be carried out in accordance with the provisions of GB/T ‘7216. The sampling location and testing frequency of the metallurgical structure of the casting shall be agreed between supplier and buyer
The inspection of the metallographic structure of the special parts should be sampled and tested at a location 1.5 mm below on the surface of the casting.
9.7 Surface roughness
The casting surface roughness inspection of castings shall be carried out in accordance with the provisions of GB/T 6060.1.
9.8 Non-destructive testing
Non-destructive testing of castings shall be carried out in accordance with the provisions of 79.
9.8.1 Magnetic particle testing shall be carried out in accordance with the provisions of GB/T ‘9444.
9.8.2 Ultrasonic testing shall be carried out in accordance with the provisions of GB/T7233.1.
9.8.3 The radiographic inspection shall be carried out in accordance with the provisions of GB/T 5677.
9.9 Casting dimension
The geometry and dimensions of the casting should be checked according to the requirements of 7.3.
Samples, trial production castings need to submit a full-scale inspection report, and the quantity of inspection shall be agreed between the supplier and the buyer. For mass-produced castings, the key size (or important size) test report should be submitted in batches. The frequency and quantity of the test should be agreed between the supplier and the buyer.
9.10 Dimensional tolerance
The dimensional tolerance of castings shall be checked according to the requirements of 7.4
9.11 Weight deviation
The weight deviation of castings shall be sampled according to the requirements of 7.6.
9.12 Surface quality
The surface quality of castings shall be checked according to the requirements of 7.7.
9.13 Defects
- a) The surface defects of castings can be inspected by visual inspection or magnetic particle inspection, and auxiliary dimensional measurement methods can also be used.
- b) Defects in the inner cavity and inner surface of castings can be checked by endoscope.
- c) Internal defects of castings can be checked by X-ray, ultrasonic and other methods.
The appearance defects of castings should be visually inspected piece by piece, but for the inspection of the internal defects of castings with complex geometric shapes and internal cavity shapes, random inspections can be carried out according to the inspection frequency, quantity and method agreed by between the supplier and the buyer.
9.14 Optional test methods
Upon agreement between the supply and buyer, equivalent methods for measuring tensile strength, Brinell hardness, and metallographic structure can also be used. For example, measuring the compressive strength instead of measuring the tensile strength, see Appendix D.

